Electric eel drain cleaner: Smart Ultimate Tips

Electric eel drain cleaner: 6 Smart Ultimate Tips
A stubborn clog can turn a normal day into a messy emergency, and an electric eel drain cleaner is often the tool people mention when plungers and bottles fail. The reason is simple: an electric eel drain cleaner uses a rotating cable to reach blockages deeper than surface-level methods, without relying on harsh chemicals. When used correctly, an electric eel drain cleaner helps restore flow, reduce odors, and limit water damage by cutting the time between “slow drain” and “full stop.”
This guide stays practical: what it is, how to do the job, how to find the right unit, how to buy, how much it costs, how to install, how to clean, and what the cost really includes over time. The goal is to help any homeowner or property manager decide when an electric eel drain cleaner makes sense—and when it’s smarter to call a plumber instead.
Expect clear steps, short paragraphs, and field-tested safety habits. Used with patience and the right attachments, an electric eel drain cleaner can feel like a professional upgrade, not a risky experiment.
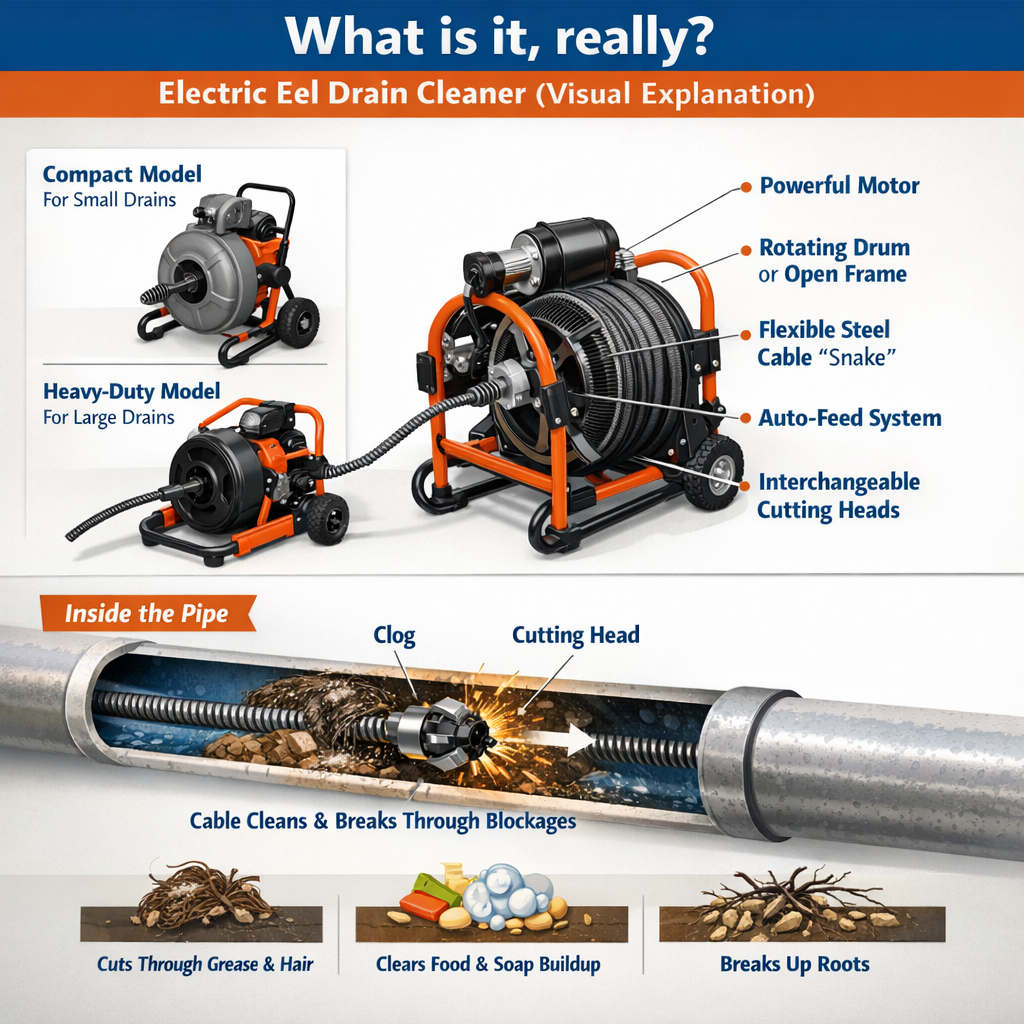
What is it, really?
An electric eel drain cleaner is a motorized drain-cleaning machine that spins a flexible steel cable (often called a snake) through a pipe to break apart, pierce, or retrieve clogs. Unlike a simple hand snake, an electric eel drain cleaner delivers consistent torque and speed, which helps the cutting head work through grease, hair, soap buildup, food waste, and some light root intrusion.
In practical terms, the tool is a controlled way to “mechanically scrub” the inside of a drain line. A typical setup includes a motor, drum or frame, a cable, and interchangeable cutting tools. Some models also add auto-feed systems that advance and retract the cable while keeping hands away from the rotating line.
For example, Electric Eel’s Model CT is described as having variable-speed control (75–350 RPM) and a 1/5 HP, 90V DC motor for drain lines up to 50 feet, depending on pipe size and cable selection. On larger equipment, the Electric Eel Model RFK100 is described as an open-cage, auto-feed machine for 3″ to 6″ lines up to 100 feet, with features such as a cable guide spring, foot switch, and built-in GFCI protection on the cord assembly.
The bottom line: an electric eel drain cleaner is not “magic.” It’s a motorized system that works best when the operator matches the cable, cutter, and technique to the pipe and the clog.
Advantages and challenges
The biggest advantage of an electric eel drain cleaner is reach and effectiveness without pouring corrosive chemicals down your plumbing. A rotating cable can break a blockage apart, pull debris back, and reopen a line in minutes when the problem is mechanical (hair mats, grease plugs, compacted sludge). Another advantage is control: with the right pace, an electric eel drain cleaner lets you work gradually, test progress, and stop immediately if something feels wrong.
However, the challenges are real. A powerful tool can also damage older piping if forced, especially in fragile, corroded, or poorly supported sections. A second challenge is mess: drain cleaning can release dirty water, sludge, and bacteria-laden spray if the work area isn’t protected. Third, there’s technique—because “more speed” is not the same as “more progress.” With an electric eel drain cleaner, slow feeding and steady cutting typically beat aggressive pushing.
Common pros and cons to keep in mind:
-
Faster clearing than hand tools for deep clogs.
-
Less chemical exposure for the home.
-
More upfront cost than a basic auger.
-
A learning curve—improper use can kink cables or crack pipes.
-
Ongoing maintenance (cleaning, drying, lubrication, cutter replacement).
If the clog returns quickly, it may indicate a bigger issue: a belly in the pipe, a collapsed section, or heavy root intrusion beyond what an electric eel drain cleaner should tackle in a DIY setting.
How to do the job safely
A good outcome is mostly preparation. Before switching on an electric eel drain cleaner, confirm the drain type (sink, shower, floor drain, main cleanout), estimate distance to the clog, and remove anything that could snag the cable (cabinet items, stored cleaning bottles, loose rugs). The cleaner the workspace, the calmer the process.
Use this step-by-step workflow:
-
Set the stage
-
Lay down a plastic sheet or old towels.
-
Place a bucket under the trap area or near the cleanout.
-
Wear gloves and eye protection.
-
-
Choose the right access point
-
Prefer a cleanout when available.
-
If using a sink, consider removing the trap for direct entry.
-
Avoid forcing through tight bends unless your cable/rod system is made for it.
-
-
Feed cable before powering on
-
Insert 8–12 inches of cable by hand.
-
Keep the cable centered and controlled.
-
-
Power on and work slowly
-
With an electric eel drain cleaner, advance in short increments.
-
When resistance is felt, pause feeding and let the head chew.
-
-
Confirm progress
-
Retract slightly, advance again, and repeat.
-
Listen for a change in pitch that suggests the blockage is breaking.
-
-
Flush and verify
-
Run water in stages (not full blast immediately).
-
Check for leaks at joints you touched.
-
Indented safety reminder:
If the cable starts to whip, bind, or twist, stop power immediately. Cable whipping is a common precursor to kinks and injuries.
A smart habit is to treat the first pass as “opening” and the second pass as “cleaning.” That’s where an electric eel drain cleaner often earns its reputation: not just puncturing a clog, but actually restoring diameter.
How to find the right fit
Finding the right electric eel drain cleaner setup is less about brand hype and more about matching three variables: pipe diameter, run length, and clog type. Small bathroom sink clogs are usually close, soft, and hair-based; mainline problems are farther, heavier, and sometimes root-related.
Start with a quick assessment:
-
Where is the clog?
-
One fixture only: usually a local branch line.
-
Multiple fixtures backing up: possible main line issue.
-
-
What’s the pipe size (likely)?
-
Sinks/tubs often connect to smaller lines.
-
Main lines are larger and need heavier cables and cutters.
-
-
How far to the street or septic?
-
Longer distance often means heavier cable and better support.
-
-
What’s the symptom?
-
Slow drain: buildup.
-
Sudden stop: foreign object or collapse.
-
Gurgling + odors: partial restriction and trapped air.
-
Then consider cable diameter and head style. Thinner cables navigate tight bends but can struggle with heavy grease or roots. Thicker cables cut better but don’t like sharp turns. With an electric eel drain cleaner, the “right” tool is often the one that moves smoothly—because smooth movement equals controlled cutting.
If you’re unsure, start smaller for fixture drains and only move up when you have a clear, appropriate access point (like a cleanout) for heavier equipment.
How to buy with confidence
Buying an electric eel drain cleaner is easiest when you decide first: DIY use a few times per year, or frequent use for rentals and service work. For occasional use, many people rent; for repeated problems, ownership can pay off quickly.
Use this buying checklist:
-
Define the job range
-
Fixture drains only, or also main lines?
-
-
Pick your feeding style
-
Manual feed: cheaper, more hands-on.
-
Auto-feed: faster, often cleaner, typically more expensive.
-
-
Look for practical safety features
-
Stable frame, guards, and a controllable switch.
-
Simple cable changes and easy drum access.
-
-
Confirm cable and cutter availability
-
Replacement cables and heads should be easy to source.
-
-
Plan storage and cleanup
-
You will store a cable that has been inside a sewer line.
-
Where to buy:
-
Plumbing supply stores (often better guidance and parts support).
-
Authorized dealers (best for warranty clarity).
-
Reputable online retailers (good selection, but confirm return policies).
A final tip: buy the unit you’ll actually maintain. An electric eel drain cleaner that never gets cleaned will rust, smell, and perform worse—no matter how powerful it is on paper.
How much and what is the cost?
“How much” depends on whether you rent or buy, what line sizes you target, and whether you need specialty cutters. The cost also depends on how often clogs return—because repeated rentals can quietly exceed the cost of ownership.
Typical cost categories to think about:
-
Acquisition
-
Renting for a day/weekend.
-
Buying new or used.
-
-
Accessories
-
Extra cables, leaders, and cutters.
-
Gloves, drop cloths, and cleaning supplies.
-
-
Maintenance
-
Lubrication, rust prevention, and occasional cable replacement.
-
-
Risk cost
-
Potential pipe damage if the tool is misused.
-
Water damage if a backup is ignored too long.
-
When people ask “what is the cost,” they often mean the sticker price. But the real “what is the cost” answer includes time, cleanup, and the value of avoiding repeated emergency calls. If you manage rentals or older homes, an electric eel drain cleaner may be cheaper over a year than multiple after-hours service visits—especially if you learn to use it safely and document a consistent process.
If the drain system is old, brittle, or has a history of repairs, consider a professional camera inspection before investing heavily. A tool can’t fix a collapsed line; it can only reveal that the problem is bigger.
How to install and set up
Installing an electric eel drain cleaner is usually less about “installation” in the construction sense and more about safe setup, correct connections, and proper positioning. Still, doing it right is what separates a smooth job from a chaotic one.
Follow this setup sequence:
-
Position the machine
-
Place it on a stable, dry surface.
-
Keep it close to the access point to reduce cable bend.
-
-
Confirm power and safety
-
Use a properly grounded outlet.
-
Keep cords out of standing water.
-
-
Attach the correct head
-
Start with a smaller head if bends are tight.
-
Switch to a wider cutter after you regain flow.
-
-
Stage your water test
-
Plan how you’ll run water to verify progress.
-
Keep towels ready for minor splashes.
-
Indented setup tip:
-
If you’re working under a sink, remove clutter and consider taking off the trap so the cable enters straight. Straight entry reduces cable wear and helps an electric eel drain cleaner work more predictably.
Finally, keep the machine’s body outside the “splash zone” whenever possible. The cable goes into the pipe; the motor and switches should stay clean and dry.
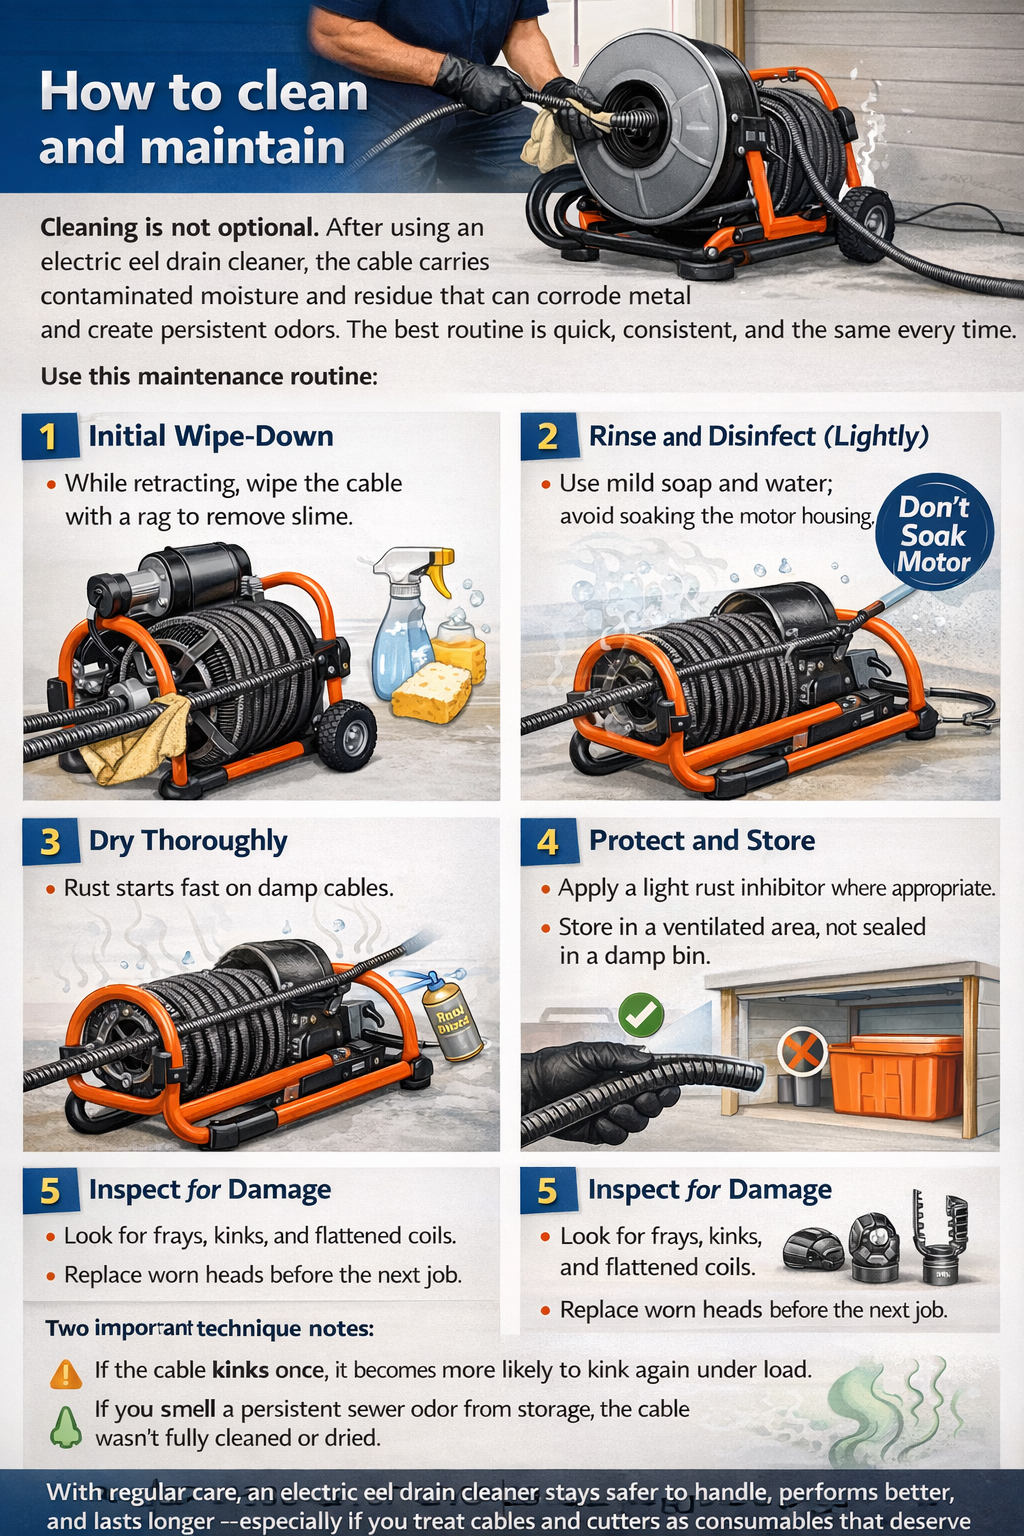
How to clean and maintain
Cleaning is not optional. After using an electric eel drain cleaner, the cable carries contaminated moisture and residue that can corrode metal and create persistent odors. The best routine is quick, consistent, and the same every time.
Use this maintenance routine:
-
Initial wipe-down
-
While retracting, wipe the cable with a rag to remove slime.
-
-
Rinse and disinfect (lightly)
-
Use mild soap and water; avoid soaking the motor housing.
-
-
Dry thoroughly
-
Rust starts fast on damp cables.
-
-
Protect and store
-
Apply a light rust inhibitor where appropriate.
-
Store in a ventilated area, not sealed in a damp bin.
-
-
Inspect for damage
-
Look for frays, kinks, and flattened coils.
-
Replace worn heads before the next job.
-
Two important technique notes:
-
If the cable kinks once, it becomes more likely to kink again under load.
-
If you smell a persistent sewer odor from storage, the cable wasn’t fully cleaned or dried.
With regular care, an electric eel drain cleaner stays safer to handle, performs better, and lasts longer—especially if you treat cables and cutters as consumables that deserve inspection.
Electric eel drain cleaner
-
electric eel drain cleaner parts typically include a motor housing, drum or cage, cable, cable guide, feed mechanism, power cord, and a selection of cutting heads. Inspect the clutch and belt guard if present. Keep gloves, a bucket, and a rag nearby to manage splash and debris on each job.
-
An electric eel sewer snake is the heavy-duty cable that travels through a main line to cut roots, scrape grease, and retrieve obstructions. Choose the diameter and head style for the pipe size. Never force the cable; let rotation and steady feed do the work while keeping hands well clear.
-
For how to use an electric eel drain cleaner, start by feeding the cable into the cleanout, then power on and advance slowly. Keep the cable moving to avoid kinks. Stop when resistance drops, then flush hot water to carry loosened debris away and run it twice for certainty.
-
To learn how to use electric eel sani rod drain cleaner, attach the flexible rod, confirm the cutter is tight, and guide it through the trap with gentle bends. Use an electric eel drain cleaner at low speed for short runs. Rinse rods, dry them, and store straight after use.
FAQ : Electric eel drain cleaner
Can an electric eel drain cleaner replace a plumber?
For simple clogs in accessible drains, it can solve the immediate problem. For repeated backups, suspected root intrusion, pipe damage, or unknown layouts, a plumber and camera inspection can prevent costly mistakes.
How do you know if you should stop and call a professional?
Stop if the cable binds hard, the pipe leaks, the clog returns immediately, or multiple fixtures back up at once. Those signs can point to structural issues beyond a typical DIY clearing.
Is it safe for older pipes?
Older pipes can be cleared, but the risk is higher. Use lower speed, gentle feeding, and avoid aggressive cutters until you confirm the pipe condition.
What if the clog clears but the drain still runs slowly?
That often means buildup remains on the pipe walls. Make a second cleaning pass, then flush thoroughly; if the slowdown returns soon, consider a camera inspection.
Should chemical drain openers be used before or after?
Avoid mixing chemicals with mechanical snaking unless you are certain what’s in the line and can protect yourself. Chemical residue can splash during cable retrieval.
How often should cables be replaced?
Replace when kinked, frayed, heavily corroded, or when performance drops. Cables are wear items, and worn cables increase the chance of binding and damage.

Conclusion
Used carefully, an electric eel drain cleaner can be a powerful way to clear tough clogs, reduce repeat backups, and regain normal drainage without harsh chemicals. Focus on matching cable size to the pipe, feeding slowly, and cleaning the equipment thoroughly after every job. When warning signs appear—recurring backups, heavy roots, or suspected pipe damage—treat that as a signal to escalate to professional diagnosis instead of pushing harder.
Other Resources
Electric Eel – Manufacturer product page listing professional drain cleaning machines and accessories.
Equip Supply – Retail page offering Electric Eel drain cleaning equipment and tools.
Home Depot – Rental page for an Electric Eel drain cleaner machine.
Other Helpful Articles
Hydrojet Drain Cleaning – Article explaining hydro jet drain cleaning methods and common use cases.
Drain Cleaner Tool – Guide describing different types of drain cleaner tools and their functions.